CHAT's user interface breaks the task of formalizing English syntax into logical parts:
Note: The screenshots below will probably not look exactly the same as CHAT does on your particular system, but the functional elements that are being described will be the same.
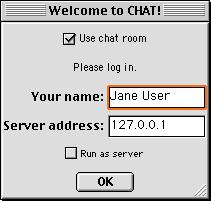
At the beginning of each session with CHAT, a login dialog is shown:
You may enter any name or nickname you like in the first field; it will be used to identify your contributions in the chat room.
The second field should contain the Internet address of a computer which is running CHAT's server program. The address may be entered as an IP address (four numbers separated by periods, like "127.0.0.1") or a host name (like "host.college.edu"). If CHAT is unable to connect to this server because of an incorrect address or a network problem, or if the computer you enter is not running CHAT's server application, then the chat room will not function. (You will be notified of CHAT's failure to connect, and all other parts of CHAT will continue to work normally.)
If you are using CHAT on a computer without network access, or if you do not want to use the chat room to collaborate with other CHAT users, uncheck the checkbox labeled "Use chat room." Then you need not enter a name or server address.
Ordinarily, you should leave the "Run as server" unchecked, unless you are a teacher or T.A. leading a CHAT session or lab. If you want to run a CHAT server on your computer, check the "Run as server" checkbox. This makes your computer the host for a chat room which can be used over the network by CHAT on other client computers. Since you will want to participate in the chat room, the Server Address field will be filled in with your computer's TCP/IP address and you will not be able to change this. Also, a console window will open, showing you the server's status messages.
Once you have logged in, you can use CHAT's navigation palette to bring up the portion of CHAT in which you want to work.
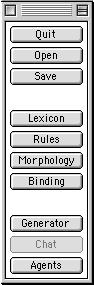
The Quit button exits CHAT, as does closing the navigation palette. You will be prompted to confirm your intention to quit, and you may cancel quitting if you wish to save your work or continue using CHAT.
The Open button allows you to locate a document containing your saved grammar and lexicon, and continue working on the grammar and lexicon contained in the file.
The Save button allows you to export your grammar and lexicon into a small document which you may later re-open.
The Lexicon button makes the Lexicon window visible so that you can edit your lexicon.
The Rules button makes the Grammar window visible so that you can edit your grammar.
The Morphology button makes the Morphology window visible so that you can edit and apply your lexical redundancy rules.
The Binding button makes the Binding window visible so that you can edit your noun-binding settings.
The Generator button makes the private generator visible so that you can test your grammar and lexicon.
The Chat button makes the Chat window visible so that you can read and contribute to the chat room. If you are not connected to a CHAT server, the Chat button will be disabled.
The Agents button makes the Agents window visible so that you can consult CHAT's agents.
CHAT allows you to change your grammar (by adding or revising phrase-structure rules) and your lexicon (by adding lexical items or revising their feature settings), as well as your lexical redundancy rules and binding settings, at any time. Don't hesitate to experiment – if you're afraid of losing your current grammar, lexicon or settings, save them so you can return to the saved file later if your changes don't work out.
The Grammar window shows all the rules in your current grammar.
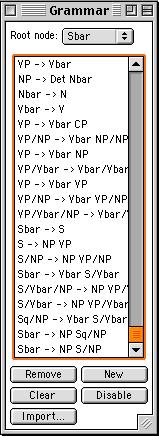
To edit a rule that you see in the Grammar window, double-click it. This will open a Rule Editor for that rule.
The Remove button deletes the selected rule from your grammar.
The New button adds a new rule to your grammar and opens a Rule Editor for the new rule.
The Clear button deletes all the rules in your grammar, allowing you to start from scratch. After clearing your grammar, the button's label changes to "Restore." Then, clicking it will restore your old grammar exactly as it was before you cleared it.
The Disable button allows you to disable the selected rule temporarily without deleting it. When a disabled rule is selected, the button's label changes to "Enable," and clicking the button allows you to enable the selected rule.
The Import button allows you to import only the grammar from a saved file.
The Rule Editor window lets you change all of the data associated with a rule in your grammar. You can have more than one Rule Editor on your screen at one time, since each one represents a single rule in your grammar. Any changes you make are not recorded in your grammar until you close the Rule Editor.

The three pop-up menus in the top row allow you to write the phrase-structure rule you want.
The left-hand menu controls the nonterminal symbol which the rule rewrites, while the two right-hand menus control the terminal or nonterminal symbol or symbols which rewrite the left-hand symbol. These menus are filled with all the nonterminal symbols that CHAT can find in your grammar; the left-hand menu always contains "S", and the right-hand menus always contain the terminal grammatical categories.
If you want to create a new nonterminal symbol, select "New..." and you will be prompted to enter a symbol of your choice.
If you want this rule to be non-branching (that is, of the form "X -> Y" rather than "X -> Y Z"), then select the blank line at the bottom of the rightmost menu. This tells CHAT that you want the second right-hand item to be null.
The two "Head" radio buttons control which of the two right-hand items is the head of this rule. You must select one of the two right-hand items as the head so that feature inheritance will work correctly. If the second item is null, the first item is forced to be the head. (These radio buttons may look like checkboxes on some systems, but they will always be mutually exclusive.)
The popup menu below the Head radio buttons controls the syntactic function of the non-head item. It is connected by a line to the non-head item to illustrate this. You may choose whether the non-head item is the specifier, the complement, or a modifier of the head item.
The checkboxes below this menu control the enforcement of feature checks, or feature agreements, when this rule is used in generation. Only the checkboxes which are appropriate to the function of the non-head item are shown. Checking one of these agreements will cause it to be enforced at this rule.
Note that it can be necessary to set the function of a null second item. For instance, to use only intransitive verbs, you must create a rule which has a verb as its head with a null complement, and enforce complement restriction.
If this rule involves movement of a gap (either by rewriting a label containing a slash, or by requiring the filler-gap dependency to be enforced), a pair of radio buttons appears allowing you to control the percolation of the gap. The radio buttons will not allow you to write an illegal rule, so if "Filler/gap dependency" is checked, or this rule is non-branching, you will not be able to change the radio buttons' setting.
If there is more than one gap, there will be more than one pair of corresponding radio buttons. In the case of more than one gap of an identical label (e.g. a rule rewriting the symbol "X/Y/Y"), it does not matter which radio buttons you use to control percolation.
The Preferred checkbox, if checked, causes the private generator to select this rule over others which rewrite the same nonterminal symbol. This does not affect sentence generation in the chat room.
The Details button (which reads "Show Details" or "Hide Details" depending on the state of the Rule Editor) allows you to hide some of the Rule Editor's controls so that you can concentrate on the rule itself, or to show all the controls so that you can set up the feature-checking correctly.
The Lexicon window shows all of the items in your lexicon.
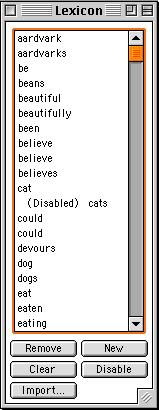
To edit an item that you see in the Lexicon window, double-click it. This will open an Entry Editor for that rule.
The Remove button deletes the selected item from your lexicon.
The New button adds a new item to your lexicon and opens a Entry Editor for the new item.
The Clear button deletes all the items in your lexicon, allowing you to start from scratch. After clearing your lexicon, the button's label changes to "Restore." Then, clicking it will restore your old lexicon exactly as it was before you cleared it.
The Disable button allows you to disable the selected item temporarily without deleting it. When a disabled item is selected, the button's label changes to "Enable," and clicking the button allows you to enable the selected item.
The Import button allows you to import only the lexicon from a saved file.
The Entry Editor window lets you change all of the data associated with an item in your lexicon. You can have more than one Entry Editor on your screen at one time, since each one represents a single item in your lexicon. Any changes you make are not recorded in your lexicon until you close the Entry Editor.
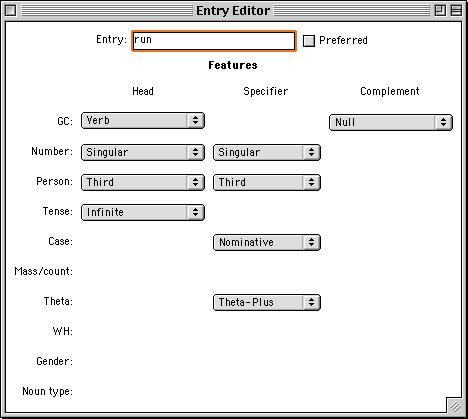
The Entry field controls the text string naming this item. You may change this at any time.
The Preferred checkbox, if checked, causes the private generator to select this item over others whose features are acceptable in a given location in generation. It does not affect generation in the chat room.
The pop-up menus in the lower part of the Entry Editor control this lexical item's linguistic features.
The leftmost column of menus controls the head-features of the item, while the middle and rightmost columns control the specifier-features and/or complement-features required by this item. Each row controls the value of a specific feature (listed from top to bottom): grammatical category, number, person, case, mass/count, and theta.
Only the menus representing features appropriate to the item's grammatical category (and to its specifier's and complement's grammatical categories) are shown.
The Morphology window shows all of the lexical redundancy rules associated with your lexicon.
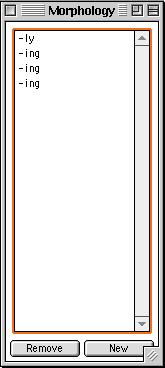
To edit a lexical redundancy rule that you see in the Morphology window, double-click it. This will open a Redundancy Rule Editor for that rule.
The Remove button deletes the selected lexical redundancy rule.
The New button adds a new lexical redundancy rule and opens a Redundancy Rule Editor for the new rule.
The Redundancy Rule Editor window allows you to edit a lexical redundancy rule and apply it to the lexicon.
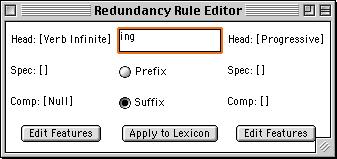
The feature cluster on the left shows the head, specifier, and complement features of lexical items to which this rule applies. If a lexical item does not have all of these features, the rule will not modify that lexical item. Click the Edit Features button below the left-hand feature cluster to open a Features dialog and change these features.
The feature cluster on the right shows the new or changed features of lexical items produced by this rule. Click the Edit Features button below the right-hand feature cluster to open a Features dialog and change these features.
The center text field shows the change that will be made to the string of each changed lexical item. This field may be left blank to produce no change, or filled in with a prefix or suffix. The radio buttons below it control whether the string is added as a prefix or a suffix to the existing lexical item's string.
The Apply to Lexicon button applies this rule to your lexicon and opens a Generated Items window containing the resulting new lexical items (if there are any).
The Features dialog allows you to edit the features which are selected or modified by a given lexical redundancy rule.
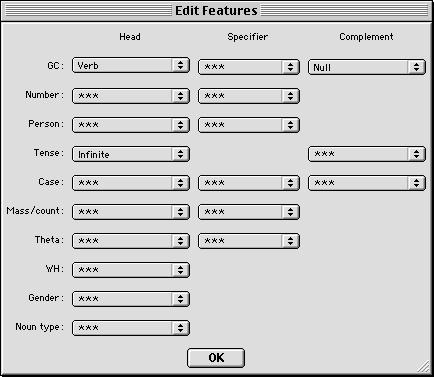
The pop-up menus, which allow you to select any combination of features, are the same as those used to edit the features of lexical items, except that they are always visible, no matter what features you have selected. This allows you to create any combination of features that you want, not only those that would make a legal lexical item.
Each menu contains an extra choice, ***, which is not a feature setting. Select this to ignore the feature in selection (if you are changing the left-hand feature cluster), or to leave it unchanged when the rule is applied (if you are changing the right-hand feature cluster).
The Generated Items window allows you to inspect lexical items generated by a redundancy rule, correct them if necessary, and add them to the lexicon.
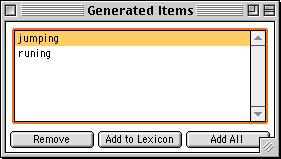
Double-click a lexical item to edit it in an Entry Editor window. This way you can correct any spelling mistakes before adding the generated items to your lexicon.
The Remove button deletes the selected lexical item, preventing it from being added to the lexicon.
The Add to Lexicon button adds the selected item to the lexicon; the Add All button adds all the items shown to the lexicon.
Close the window to delete all the shown lexical items without adding them to the lexicon.
The Binding window allows you to control noun, pronoun, and anaphor binding in CHAT's generator.
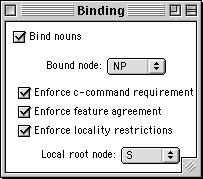
The Bind Nouns checkbox turns CHAT's binding system on and off.
If noun binding is on, you must select a bound node. This should be your grammar's maximal projection of the noun (NP in most grammars). Binding may behave strangely, or cause generation to fail, if the wrong node label is selected.
The three lower checkboxes turn on and off some restrictions on binding. The first one, if checked, requires that a bound node be c-commanded by its binder. The second requires that the relevant features (number, person, gender) of bound items agree. The third requires that pronouns be free locally and that anaphors be bound locally. For the locality restrictions to work properly, you must select a local root node. This should be your grammar's root node for clauses, not the root node for entire sentences (S in most grammars). Binding may behave strangely, or cause generation to fail, if the wrong node label is selected.
The Private Generator allows you to test your grammar and lexicon by generating sentences based on their current state.
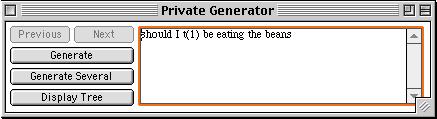
The Generate button generates a sentence based on your current grammar and lexicon. If you are using a version of CHAT which supports word choice, a Word Choice dialog prompts you to choose the words of your sentence. The resulting sentence is shown in the text area to the right of the button. If no sentence can be generated using your current grammar and lexicon, the sentence "Sorry, generation failed" appears there instead. Hold down the Alt or Option key while clicking the Generate button to generate several sentences at once.
The Display Tree button creates a Tree Display window showing the parse tree for the sentence appearing in the Private Generator.
The Previous button displays the sentence generated just before the currently showing sentence; the Next button displays the sentence generated just after the current sentence. Each button is active only when at least one sentence exists before or after the current sentence.
If you are using a version of CHAT that includes word choice, a Word Choice dialog appears every time you generate a sentence (privately and for the chat room). The Word Choice dialog allows you to choose the words in your sentence from all entries in your lexicon whose features check properly at each point in the sentence.
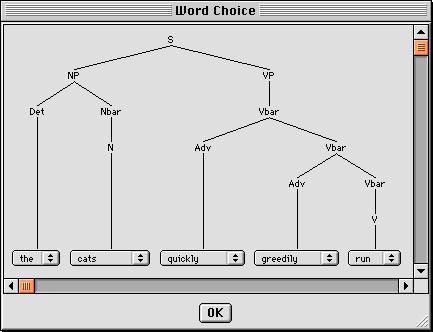
The dialog shows the parse tree for your sentence, with popup menus replacing the terminal lexical items. Each menu contains all the entries from your lexicon which can legally be used at that place in the tree. The initially selected words are chosen randomly (although your preferences are taken into account when generating a setence in the Private Generator).
If the tree is too large to fit in the dialog, you can resize the dialog, or use the scroll bars to see different parts of the tree.
Select the words you want to use in the sentence, and click the OK button when you have finished. If you don't care what words are used, just click the OK button, and the randomly chosen initial words will be used.
Tree Display windows display parse trees for sentences generated in CHAT, in the chat room as well as the private generator.
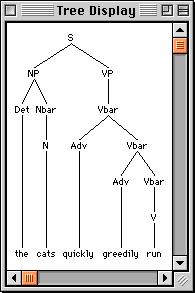
If the tree does not fit in the window, you can resize the window, or use the scroll bars to show the part of the tree in which you are interested.
The Chat window displays the sentences that have been sent to the chat room since you logged in. You can send sentences to the chat room for others to read, and display the parse trees for sentences that you or others sent.
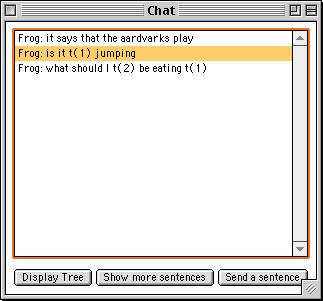
The Display Tree button creates a Tree Display window which shows the parse tree for the selected sentence.
The "Show more sentences" button opens a More Sentences window, allowing you to inspect a few more sentences generated by the grammar that generated the selected sentence. The extra sentences were generated at the same time as the sentence shown in the chat room, but their words were chosen randomly, not selected by the grammar's creator. This can reveal interesting facts about the grammar.
The "Send a sentence" button generates a sentence based on your grammar and lexicon and sends it to the chat room. If you are using a version of CHAT which supports word choice, a Word Choice dialog prompts you to choose the words of your sentence. If no sentence can be generated based on your grammar, the sentence "Sorry, generation failed" is sent instead.
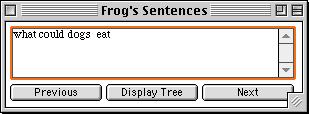
The More Sentences window shows you a few extra sentences generated by the grammar that generated the sentence selected in the chat room. Sentences are displayed one at a time, just as in the Private Generator. Use the Previous and Next buttons to move from sentence to sentence, and the Display Tree button to show a Tree Display window for the current sentence.
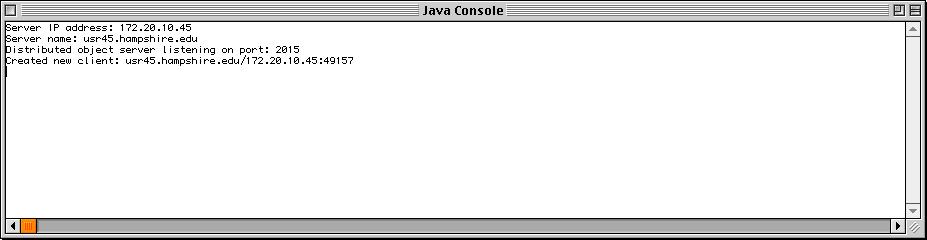
If you are running a CHAT server on your computer, a console window will open, showing you messages about the server's activity. You can safely ignore these messages, although they are useful if you want to know the names and IP addresses of currently connected computers. The console will look different on different operating systems (the Mac OS 9 version is shown above), but the messages will remain the same.
If the server is running properly, it will show the message "Distributed object server listening on port: ????," with ???? being some port number. If it has failed to start up, it may display a message like "Error initializing ClientManager," and you should check your network connection.
The first two messages from a running server will always contain the server's IP address and host name. Make a note of one or the other and give it out to other CHAT users: in order for them to use your chat room, they must enter your computer's IP address or host name in their login dialog when they start CHAT.
The Agents window allows you to interact with CHAT's built-in software agents.
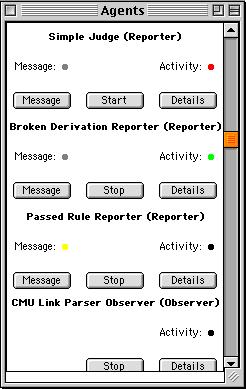
The window displays a list of agents, with each agent having some indicators and controls below its name.
The Activity indicator light informs you of the agent's status. If the agent is stopped, the indicator will be red; if the agent is running, the indicator will blink green. The frequency of the blinks may be fast or slow, indicating the speed of the agent's activity.
The Start/Stop button allows you to turn the agent on or off, temporarily or until you stop running CHAT.
The Details button creates an Agent Details window showing some under-the-hood details of the agent's activity, in case you are curious. Some agents have no detail messages, while others have several.
The Message indicator light is yellow if the agent has a new message to report since the last time you clicked the Message button.
The Message button creates a Message window showing the message which the agent is reporting to you.

The Message window shows a message from a reporter agent. The Agent Details window, which looks identical except for its title, shows the details (if any are recorded) of an agent's activity. Each individual message shown in the window is stamped with the date and time that the agent posted it, and the most recent is shown first.